Tag Archives: LG iPECS

Adding Headset to LG Phones

Recently I added some headsets (Jabra PRO 9450) to a range of LG LIP-8012D and LG LIP-8024D phones.

  1. The electronic hook switch plugs into the back of the handset, with the coloured strip (usually indicating pin 1) facing up. It’s best to remove the power, add the accessory, then plug it back in, otherwise, the phone won’t recognize the accessory.
    A second cable for audio is required from the headset port on the back of the phone to the base use of the headset. (only control signals are sent down the electronic hook switch cable)
  2. The handset requires programming to be told to use the handset and not the speakerphone.
    Trans PGM > 6 > 1.
    Select 0 for headset then Hold/Save.
  3. The handset requires programming to be told to ring in the headset:
    Trans PGM > 6 > 2
    Select 2 for headset or 3 for both, then Hold/Save
  4. That’s about it. Enjoy

LG iPECS Least Cost Routing (LCR)

Recently I had a bunch of trouble with some SIP trunks (read about it at: LG IPECS SIP Trunk Issue) and needed to edit the Least Cost Routing (or Least Call Cost Routing).

The system is pretty basic, landline calls go out of one CO group, calls to mobiles go to another CO group.
There are a couple of tables that control how LCR works: LCR LDT (PGM 221) and LCR DMT (PGM 222).

LCR LDT – Leading Digit Table – PGM 221
This is where the ‘patterns’ are setup, so that the phone system knows what to do with the call, based on the starting digit(s).
Check out this screenshot for a full view:

These are setup under Index 1,
Then in subindex 0-6 are setup for landlines, 7 is setup for the mobile calls.
For each of the Subindex 0-6, it looks at DMT 01
For the Subindex 07 (Mobile calls), it looks at DMT 02

LCR DMT – Digit Modification Table – PGM 222
[To be honest, I have no idea what is actually happening here, except for the reference to the CO/IP Group].
Index 1 routes via CO/IP Group 1
Index 2 routes via CO/IP Group 2
– Index 2 also has an Alternative DMT Index (3) – This is used when all the lines in CO/IP Group 2 are busy
Index 3
– Routes via CO/IP Group 1.

Check out this screen for a full view:

Seems to work alright.

LG IPECS SIP Trunk Issue when WAN IP Address Changes (How to start to troubleshoot VoIP Issues with Wireshark)

Recently I had an issue with a couple of SIP trunks configured on an LG IPECs system when the WAN IP Address Changes.
TL;DR Version – I was getting a SIP2.0 502 Bad Gateway Error, turns out that the SIP provider (sip.iboss.com.au) had a setting that restricted the IP address that was being used to initiate the connection.

Basic Setup:
Router -> Switch <- IPECS The switch is a Cisco POE managed switch, with Voice Traffic on a VLAN. All the IPECS phones connect to the switch. The IPECS unit and the Router also connect into the switch. SIP trunks were setup on 2x of the CO lines. I was swapping the router from ADSL to NBN (vDSL). How to begin to troubleshoot the VoIP Connection issue. When I switched the router over (NBN), and tried dialling out on the phone they would say something like "Normal Call Clearing", and not ring. Yet, when I switched back to the original router (ADSL), it would work as normal. A lot of Googling suggested using Wireshark to inspect. How to start to troubleshoot VoIP Issues with Wireshark: Step 1) Install Wireshark on a machine Step 2) On one of the Switch ports, enable 'Mirror Mode'. On the Cisco web UI this was under Admin > Diagnostics > Port Mirroring. – Note: because VLANS were in use, I needed to mirror a VLAN, but first I had to remove the port from the VLAN, then choose that VLAN in the Port Mirroring Setup.
Step 3) Fire up Wireshark, choose the LAN connection that is connected to the Mirrored port and start the capture.

It’s always nice to see what something looks like when it ‘works’, so I first setup the ADSL router, hooked up wireshark and started the capture, I tried calling my mobile and answered it, then hung up, then stopped the capture.
Then in Wireshark you can click on ‘Telephony’ in the top menu and select SIP and will show you the connection, then click on ‘Prepare Filter’ and it will limit the main screen down to the packets that were involved in the phone call. Pretty Cool.
Closing the Telephony screen, if you right click on the first packet in the list (The Info column should say something like “Request: INVITE sip…….”), go down to Follow, then UDP Stream and a somewhat human-readable stream appears. I copied that screen out into Text File (notepad, notepad++, etc) for use later.

I then swapped over the router, did the same process as above and copied the new flow of data into another Text File.
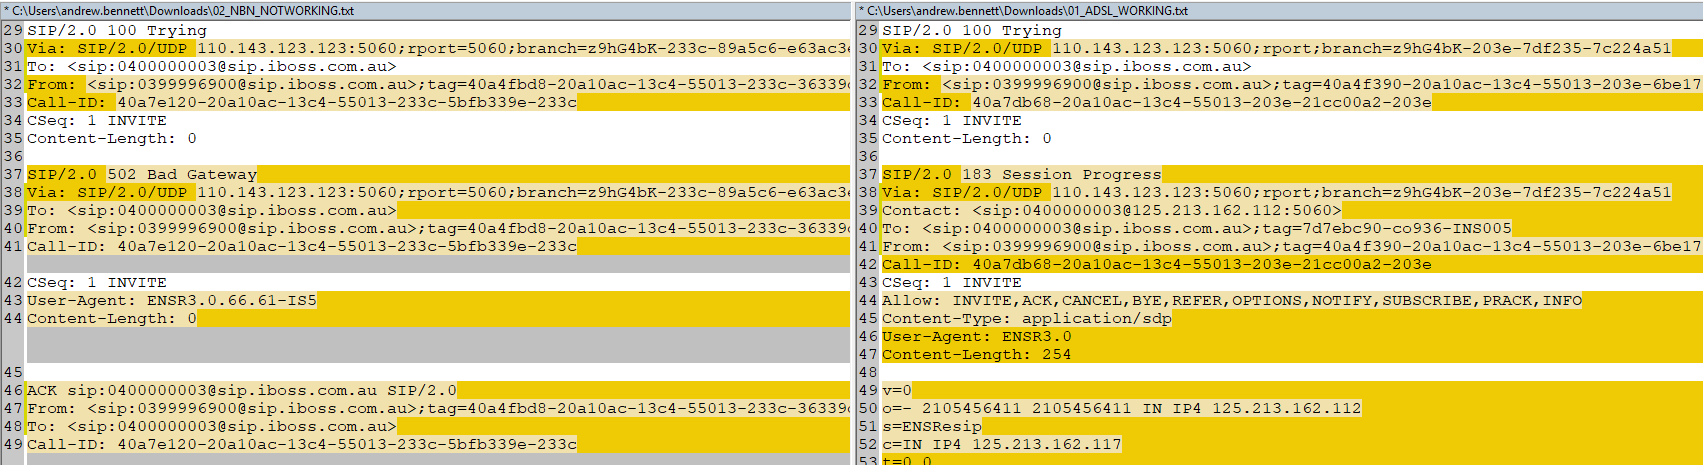
I then compared the two files side by side using WinMerge.

The first part, looks ok. It’s natural that the IDs would change between calls.

Scroll down a bit and o dear, here is where we hit a problem.

From there it a was a case of trying various configurations. I swapped around routers (SIP ALG causes all sorts of issues with SIP lines), I tired 4G connections, finally I rang the VoIP provider – who last week told me that there wasn’t any IP address security restrictions – I was informed (I think by asking the right question and being blunt – “Are the VoIP Trunks tied to an IP Address?”) that yes they could change the configuration for me.

Side note: To make things a little easier in the testing, I copied the config from the iPECS into a Free Open Source Softphone – MicroSIP. I also had a secondary SIP account to test with a completely different provider, so my test process went something like this:
Bring up WAN connection on Router:
– Bring up Working secondary SIP account – call mobile. – Call connects and works. Router is working OK.
– Bring up Primary SIP account – call mobile. – Call works / fails.
– Change something (firewall rule, WAN connection, entire router)
– Repeat process.

By doing it this way, I have a ‘known’ test (Secondary SIP Account) that I can try, before trying the ‘unknown’ (Primary SIP Account)

Secondary Side Note: The LG iPECS has a field for “Firewall IP Address”, I believe that this is better described as “WAN IP Address”. It’s changed under ‘System&Device IP’ PGM 102 / PGM 103. It appears to use this in the SIP packets. I updated this before doing my WAN testing. Interestly, even with it set to the ‘Wrong’ IP address, things still worked?

Safe to say, I’m currently hating knowing this much about VoIP packets right about now…

LG IPECs Tips and Tricks

Things I’ve had to pick up from working with an LG IPECs phone system.

1) Default Phone Password is: 147* (for when prompted when you first take them out of the box).

2) Setting up an additional phone.
– Make sure that DIP switch 3 is set to ‘on’ to allow additional handset registration.
– On another phone Go to ‘Trans/PGM’ -> [7] Supplementary -> [8] Network Config to see how the system in setup (handy for finding VLANs and such).
– Plug in the new phone and set the settings similar to the current one, just using a different IP address.

2) Voicemail.
– Voicemail is setup as a Hunt Group, the station has to call into that Hunt group and provide a Password, the password is the extension number, followed by the code found in the Authorization Code Table (227).
If the code was 111, the password for Extension 246 would be 246111

– Voicemail can be sent to email. Here is a document outlining how to do it: http://www.ariatech.com.au/uploaded/File/iPECS/QHG-KB/Q522_VSF_to_Email.pdf

3) System Speed Dial / Public Directory.
– Nobody likes bashing in a bunch of contacts on the desk phone. They can instead be updated via the ‘System Speed Dial’ screen in the Web management tool, found under ‘System Data’ -> ‘System Speed Dial’

4) Changing Extensions around.
Update the extensions in Flexible Station Number(PGM 105)
And don’t forget the Flexible DID table (Flexible DID Conversion(231))

5) Performing a factory reset. Flick DIP4 to ON (Same as DIP3 above), remove power, return power. Manually configure network IP to 10.10.10.x / 255.255.255.0 (where X is any number between 3 and 254) and Open up a web browser and go to https://10.10.10.2
Default password is empty. From here, upload a database backup, connect MFIM back into Network and remember to flick DIP4 to Off, otherwise the next time it reboots it will forget the database.

6) Checking a handset firmware:
Trans/PGM -> 79 (all the Phone PGM codes can be found here: https://www.nonstoptelecom.com/site/download/LIP-8012E-8024E.pdf)

7) Adding a DND Flex button for a Hunt Group. It’s possible to do this from the handset, but I needed to do it from the webadmin.
In Flexbutton UI, set the Type to ‘Programming (Numbering Plan) then the Value of 571XYZ where XYZ is the Hunt group. Upon saving the Value should change to ‘HUNT DUTY(XYZ)’ (again XYZ is the Hunt group).