Category Archives: Web

Style Guide Library / Reference List

Sample / Useful Style Guides when it comes to language.

Company Style Guides for Inspiration

Tools

Issue with WordPress Autoptimize Cache filling up cPanel Server Space.

Issue with Autoptimize Cache filling up cPanel Server Space.
As a temporary fix, just run a cron to delete all the cache files once an hour.
– I have only seen this issue with a Multisite install, but I haven’t had a problem on single site installs.

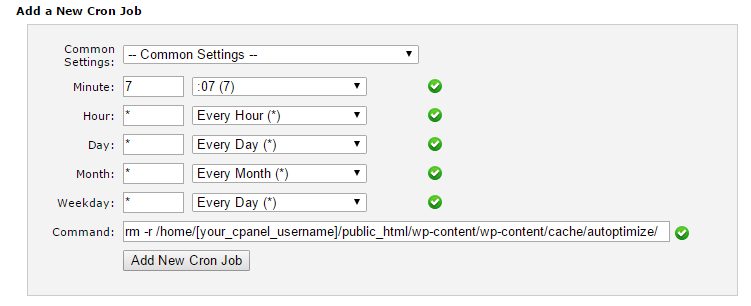
Log into cPanel go to CRONs

Under ‘Add a New Cron Job’ use the following settings:

Minute: 7
Hour: *
Day: *
Month: *
Weekday: *

Under the command section you need to first work out where your WordPress site is installed,
usually under cPanel it is under /home/[your_cpanel_username]/public_html/

Then you need to add the folder of the Autoptimize Cache folder, so the entire thing looks something like this:

/home/[your_cpanel_username]/public_html/wp-content/wp-content/cache/autoptimize/

Add the command rm -r at the start, put it all together and you have the right command:
!IMPORTANT! – The command rm -r will delete everything in the folder, if you get the path to the folder wrong, you could delete your entire website. You have been warned!

rm -r /home/[your_cpanel_username]/public_html/wp-content/wp-content/cache/autoptimize/


2016-01-14 10_20_04-cPanelX-CronJobs

So what we are doing is just at 7 minutes past the hour, of all hours, of all days, of all months, each weekday (that’s how you read the * in the cron) we delete all the files in the folder that we told it too.

WordPress MU Organise uploads

In a WPMU install there is no check box for “Organize my uploads into month- and year-based folders”

Instead you need to do the following:

network dashboard > my sites > sites

then edit each site, select site settings

then scroll down to “Uploads Use Yearmonth Folders”.
1= yes year/month,
0 = no year month, instead upload to /siteid/files/

Thanks to http://premium.wpmudev.org/forums/topic/how-do-i-turn-on-the-check-box-for-yearmonth-folder

osTicket 1.9.4 –Easy Custom Column in Ticket View

By popular demand, I have update the instructions for the Easy Custom Column for osTicket 1.9.4 for form lists.

What does this allow you to do?
It allows you to show a custom form list in your Agents Ticket Queue. This is rather helpful for when you have a list of items relating to your business and you want to be able to see it.

I have only tested this code with lists.

The full code can be found here:

https://gist.github.com/a-bennett/6febddc9e328151dc99a

For those who are interested in doing it themselves (or maybe have already edited there tickets.inc.php file) you can see the changes between the original file and the updated here:

https://gist.github.com/a-bennett/6febddc9e328151dc99a/revisions

How do I find the form ID?

  1.   By looking at the table _form_field and finding your form object by looking down the list of the labels, then once you have found it taking the ID from that row.
  2. If you know how to inspect an web element, (using web inspector, firebug, etc) then you can try the following:
    In the admin panel go to “Manage” -> “Forms” -> click on your form name.
    Inspect the input field of the name of your item mine came up like this:
    <input type=”text” size=”32″ name=”label-17″ value=”Business”>
    Then take the number after the “label-X” so mine is 17.

For those interested here is a break down:

At the top of the file add the following two lines:
$ab_list[‘field_id’] = “XX”; //ID from from _form_field table
$ab_list[‘heading’] = “XXXXXXX”; //Name displayed to front end users.

~Line 169:
Update the $sortOptions array withe the following:

$sortOptions=array(‘date’=>’effective_date’,’ID’=>’ticket.`number`*1′,
‘pri’=>’pri.priority_urgency’,’name’=>’user.name’,’subj’=>’cdata.subject’,
‘status’=>’status.name’,’assignee’=>’assigned’,’staff’=>’staff’,
‘dept’=>’dept.dept_name’,
‘custom1’=>’Custom1′); //AB Added

~Line 253
Append to the end of the $qselect. variable the following: (remember to move the ;)
.’ ,cdata.’.$CustomList1Name.’ as Custom1′; //AB – Custom 1

~Line 262
Add the following to the $qfrom variable straight after the line:

.’ LEFT JOIN ‘.TABLE_PREFIX.’ticket__cdata cdata ON (cdata.ticket_id = ticket.ticket_id) ‘
.’ LEFT JOIN ‘.TABLE_PREFIX.’form_entry_values fentry_val ON (cdata.field_’.$ab_list[“field_id”].’ = fentry_val.entry_id) AND fentry_val.field_id = ‘.$ab_list[“field_id”] //AB We need to link to the form values as of 1.9.4

~Line 412

Add in the following header row just above the </tr>.

<!– AB – Custom Col 1 –>
<th width=”60″ >
<a <?php echo $custom1_sort; ?> href=”tickets.php?sort=custom1&order=<?php echo $negorder; ?><?php echo $qstr; ?>”
title=”Sort By <?php echo $CustomList1Desc; ?> <?php echo $negorder; ?>”><?php echo $CustomList1Desc; ?></a></th>
<!– AB – Custom Col 1 -–>


~Line 498

Add in the data row just about the </tr>
<!– AB – Custom Col 1 –>
<td nowrap>&nbsp;<?php echo $row[‘Custom1’]; ?>&nbsp;</td>
<!– AB – Custom Col 1 –>

~ Line 511

Finally update the footer colspan to make everything balanced.

<td colspan=”8″>
cforms v14.6 – switching to custom CSS 403 error

Quick Notes:
TL;DR – When activating a custom CSS from the folder:
/plugins/cforms-custom/[your-css-file].css
You get a 403 error while running WordPress 4.

The issue seems to be in: cforms-css.php
~Line: 142:
Change: echo ‘<option style=”background:#fbd0d3″ selected=”selected” value=”../../cforms-custom/’.$f.'”>’.$f.'</option>’.”\n”;
To: (removing one of the ../)
echo ‘<option style=”background:#fbd0d3″ selected=”selected” value=”../cforms-custom/’.$f.'”>’.$f.'</option>’.”\n”;

Then again on ~Line: 144:
echo ‘<option value=”../../cforms-custom/’.$f.'”>’.$f.'</option>’;
To: (removing one of the ../)
echo ‘<option value=”../cforms-custom/’.$f.'”>’.$f.'</option>’;

This then causes an issue on the frontend. To fix this:

edit: cforms.php

Replace the following (~Line 1209):

if( $cformsSettings[‘global’][‘cforms_no_css’]<>’1′ )
echo ‘<link rel=”stylesheet” type=”text/css” href=”‘ . $cforms_root . ‘/styling/’ . $cformsSettings[‘global’][‘cforms_css’] . ‘” />’.”\n”;

With:

if( $cformsSettings[‘global’][‘cforms_no_css’]<>’1′ ){
if (strpos($cformsSettings[‘global’][‘cforms_css’],’cforms-custom’) !== false) {
$cformsCSSpath = “/”;
}else{
$cformsCSSpath = ‘/styling/’;
}
echo ‘<link rel=”stylesheet” type=”text/css” href=”‘ . $cforms_root . $cformsCSSpath . $cformsSettings[‘global’][‘cforms_css’] . ‘” />’.”\n”;
}


I hope that helps someone.


This doesn’t appear to work on both the front and the back end…

osTicket 1.9.2 – Easy Custom Column in Ticket View

Dec 14 Update:While these rough instructions can be roughly used in osTicket 1.9.4, it doesn’t return the value from a list, just an ID (Which on a technical level is better in the long run, just makes this process a little harder).
I’m working on fixing this and will post the info once I’ve had a chance to work it out.
New instructions for 1.9.4 can be found here: https://www.andrewbennett.com.au/2014/12/osticket-1-9-4-easy-custom-column-in-ticket-view/

TL;DR (I rushed these notes for myself).

File to edit: /include/staff/tickets.inc.php

1) Added To the top to make things easier. (line 2-3)
The Name field (currently “field_17” ) needs to be worked out from the database by looking at the [tbl_prefix]_ticket__cdata
The Desc field (Currently “Sample 1”) is what your users will see as the column heading.

$CustomList1Name = “field_17”;
$CustomList1Desc = “Sample 1”;

2) Add custom1 to allow sorting. (~Line 157)

$sortOptions=array(‘date’=>’effective_date’,’ID’=>’ticket.`number`’,
‘pri’=>’pri.priority_urgency’,’name’=>’user.name’,’subj’=>’cdata.subject’,
‘status’=>’ticket.status’,’assignee’=>’assigned’,’staff’=>’staff’,
‘dept’=>’dept.dept_name’,
‘custom1’=>’Custom1’); //AB Added

3) Edit the last two lines, frst remove the ; after “pri.priority_color'” then add the last line  (~Line 243)
After line:

$qselect.=’ ,IF(ticket.duedate IS NULL,IF(sla.id IS NULL, NULL, DATE_ADD(ticket.created, INTERVAL sla.grace_period HOUR)), ticket.duedate) as duedate ‘
.’ ,CAST(GREATEST(IFNULL(ticket.lastmessage, 0), IFNULL(ticket.closed, 0), IFNULL(ticket.reopened, 0), ticket.created) as datetime) as effective_date ‘
.’ ,CONCAT_WS(” “, staff.firstname, staff.lastname) as staff, team.name as team ‘
.’ ,IF(staff.staff_id IS NULL,team.name,CONCAT_WS(” “, staff.lastname, staff.firstname)) as assigned ‘
.’ ,IF(ptopic.topic_pid IS NULL, topic.topic, CONCAT_WS(” / “, ptopic.topic, topic.topic)) as helptopic ‘
.’ ,cdata.priority_id, cdata.subject, pri.priority_desc, pri.priority_color’
.’ ,cdata.’.$CustomList1Name.’ as Custom1 ‘ //AB – Custom 1
;

4) Add Column Heading (~ Line 337)

<!– AB – Custom Col 1 –>
<th width=”60″>
<a <?php echo $custom1_sort; ?> href=”tickets.php?sort=custom1&order=<?php echo $negorder; ?><?php echo $qstr; ?>”
title=”Sort By <?php echo $CustomList1Desc; ?> <?php echo $negorder; ?>”><?php echo $CustomList1Desc; ?></a></th>
<!– AB – Custom Col 1 –>

5) Add Column Data (~ Line 435)

<!– AB – Custom Col 1 –>
<td nowrap>&nbsp;<?php echo $row[‘Custom1’]; ?>&nbsp;</td>
<!– AB – Custom Col 1 –>

When I get around to it I will upload the file to github or bitbucket.

Compiling PHP into an EXE along with additional command line arguments

Recently I was building a simple PHP script that took the input of a CSV and extracted the data from it and feed it into a JSON-RPC based API.

Originally I had planned to automate the FTP of the CSV to the server, but then I thought if I could take the PHP file to the CSV it might be easier. The other issue I had was that I didn’t want to setup a complete server just to run a single PHP file.

Enter PHC-WIN: http://wiki.swiftlytilting.com/Phc-win

phc-win appears to be one of the simplest options for converting a simple script into a simple exe file (although a handful of DLL files are required to make the exe file run).

After testing and experimenting with the compiler, I thought “wouldn’t it be great to be able to pass some additional command line arguments to the complied file (think the filename of the CSV file).”

Well it turns out that you can. The variable that sorts the additional arguments is the “$_SERVER[‘argv’] array.

A simple print_r($_SERVER[‘argv’]); command allows you to see all the arguments and the order that they are passed to the program. It appears that the first one (position 0) is always the name of the application.

Quick, simple and easy :).


Creating a ticket via the osTicket API using PHP & Crontab (cron job)

I feel that there is very little documentation and examples around of how to do this, and it bugged me for more than 10 minutes, so I thought I’d share my findings.

The documentation can currently be found here: https://github.com/osTicket/osTicket-1.7/blob/develop/setup/doc/api.md and here: https://github.com/osTicket/osTicket-1.7/blob/develop/setup/doc/api/tickets.md

A sample script can be found here: https://github.com/osTicket/osTicket-1.7/blob/develop/setup/scripts/rcron.php (which is what I based the following example off).

But I like to be somewhat lazy and copy and paste a script, test to see it works and then go about tweaking it.

#!/usr/bin/php -q
 URL to api/tickets.json e.g http://yourdomain.com/support/api/tickets.json
# key => API's Key (see admin panel on how to generate a key)
#

$config = array(
'url'=>'http://yourdomain.com/support/api/tickets.json',
'key'=>'[long api key goes here]'
);

#pre-checks
function_exists('curl_version') or die('CURL support required');

#set timeout
set_time_limit(30);

#Sample data for the ticket
# See https://github.com/osTicket/osTicket-1.7/blob/develop/setup/doc/api/tickets.md for full list of variables and options that you can pass.
$data = array("alert" => "true",
       "autorespond" => "true",
       "source" => "API",
       "name" => "Angry User",
       "email" => "[email protected]",
       "subject" => "Testing API 3",
       "message" => "MESSAGE HERE"
);
#Convert the above array into json to POST to the API with curl below.
$data_string = json_encode($data);

#curl post
$ch = curl_init();
curl_setopt($ch, CURLOPT_URL, $config['url']);
curl_setopt($ch, CURLOPT_POST, 1);
curl_setopt($ch, CURLOPT_POSTFIELDS, $data_string);
curl_setopt($ch, CURLOPT_USERAGENT, 'osTicket API Client v1.7');
curl_setopt($ch, CURLOPT_HEADER, TRUE);
curl_setopt($ch, CURLOPT_HTTPHEADER, array( 'Expect:', 'X-API-Key: '.$config['key']));
curl_setopt($ch, CURLOPT_FOLLOWLOCATION, FALSE);
curl_setopt($ch, CURLOPT_RETURNTRANSFER, TRUE);
$result=curl_exec($ch);
curl_close($ch);

if(preg_match('/HTTP\/.* ([0-9]+) .*/', $result, $status) && $status[1] == 200)
exit(0);

echo $result;
exit(1);
?>


Then follow your hosts instructions for adding a Cron Job.
Mine looks something like this:

php /home/abennett/public_html/sample-api.php

Be the first to discover when the Google Nexus Available in Australia 2013

GoogleNexus4The Google Nexus 4 is a hot phone. It was reportedly sold out in Australian within the first hour of being released.

The story is simple and short, I want one, but I missed out (and if your reading this, chances are you want one too).

So I gave the project to one of my techs at BenO Logics. Their task is to have my phone alert me when the Google Nexus is available again in Australia. They have setup not 1, not 2, but multiple alert systems to let me know, even with geo redundant backup! How awesome of them.

After discussing the idea with a few friends, I quickly discovered that a lot of people are interested in knowing when it comes available. Given that I’m into open source software and things like the creative commons license, I decided I should setup a system that allows others to be notified when I know.

So if you want to be among the first in Australia to know when the Google Nexus is Available, sign up below.

It’s quick, simple and easy. And no we won’t spam you*

[mailchimpsf_form]

Do you want us to setup a monitor for another hot product? If so, get in contact and we can see what we can do.

* We are fully transparent with this, your details will be placed into a Mailchimp email list. We will send you updates about the Release of the Google Nexus 4. You can easily unsubscribe at any time.