Tag Archives: automation

Scripting a reboot of a Billion Router over Telnet

Sometimes with older hardware and ADSL connections, you just need to do a reboot every now and then. Newer modems let you do this, but the Billion one I had the joy of playing with today, didn’t.

Lets turn to a simple script running on a Linux box on the same subnet.
Turns out using ‘expect’ you can script a Telnet session. (I know, Telnet isn’t ideal). This could be used across switches, routers, modems, other random boxes that require a telnet interface.

Create a File

nano modem-reboot.sh

Add the code. You’ll need to change the “expect” values as necessary

#!/usr/bin/expect
#If it all goes pear shaped the script will timeout after 20 seconds.
set timeout 20
#First argument is assigned to the variable name
set name [lindex $argv 0]
#Second argument is assigned to the variable user
set user [lindex $argv 1]
#Third argument is assigned to the variable password
set password [lindex $argv 2]
#This spawns the telnet program and connects it to the variable name
spawn telnet $name
#The script expects login
expect "Login:"
#The script sends the user variable
send "$user\r"
#The script expects Password
expect "Password:"
#The script sends the password variable
send "$password\r"
#This hands control of the keyboard over two you (Nice expect feature!)
#interact
#Reboot
expect "admin>"
# Change the following value to whatever your devices reboot command is.
send "system restart\r"

Finally make the file executable


chmod +x modem-reboot.sh

Test it.

Help it doesn’t work.
Under a stock standard Ubuntu 14.04 install I had to add the ‘expect’ package

sudo apt-get install expect

Thanks to http://stackoverflow.com/questions/7013137/automating-telnet-session-using-bash-scripts for the assistance and starting point of the script.
Issue with WordPress Autoptimize Cache filling up cPanel Server Space.

Issue with Autoptimize Cache filling up cPanel Server Space.
As a temporary fix, just run a cron to delete all the cache files once an hour.
– I have only seen this issue with a Multisite install, but I haven’t had a problem on single site installs.

Log into cPanel go to CRONs

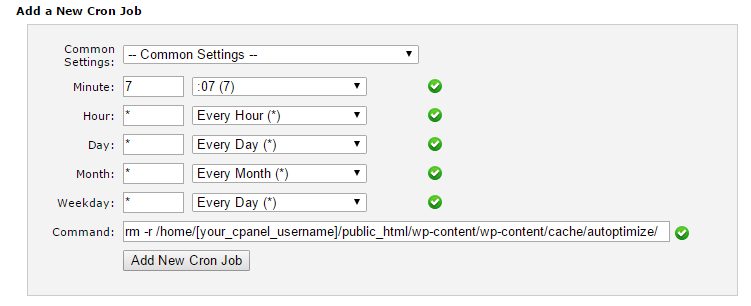
Under ‘Add a New Cron Job’ use the following settings:

Minute: 7
Hour: *
Day: *
Month: *
Weekday: *

Under the command section you need to first work out where your WordPress site is installed,
usually under cPanel it is under /home/[your_cpanel_username]/public_html/

Then you need to add the folder of the Autoptimize Cache folder, so the entire thing looks something like this:

/home/[your_cpanel_username]/public_html/wp-content/wp-content/cache/autoptimize/

Add the command rm -r at the start, put it all together and you have the right command:
!IMPORTANT! – The command rm -r will delete everything in the folder, if you get the path to the folder wrong, you could delete your entire website. You have been warned!

rm -r /home/[your_cpanel_username]/public_html/wp-content/wp-content/cache/autoptimize/


2016-01-14 10_20_04-cPanelX-CronJobs

So what we are doing is just at 7 minutes past the hour, of all hours, of all days, of all months, each weekday (that’s how you read the * in the cron) we delete all the files in the folder that we told it too.

[How to] Bulk import/rip multiple CDs easily in Windows. (Windows 7 and Windows Media Player)

Recently I had the task of importing a large number of CDs. Being one that doesn’t boring and tedious task like this I set out to make it as easy as possible. It seems that Windows Media Player is rather good at this (or at least version 12 is, the one with Windows 7).

I was able to get it to a point where I had 2 piles of CDs. One to rip and one that had been ripped and all I had to do was take 1 from the to Rip pile, insert it into the CD tray and then after the tray ejected (automatically) I placed it in the ripped tray and then proceeded with the next CD, so on for the next 30 or so CDs. All with no software interaction.

Here is how I did it.

1) I inserted the first CD and opened up Windows Media Player.

2) In the library video click on “Organize”  -> “Options” -> “Rip Music” Tab.

3) I set all the information required:

  • Location of files
  • Format (I used MP3 at Best Quality or 320 kbps – Hard drive space is cheap these days).
  • I also ticked “Rip CD automatically” and “Eject CD after Ripping.

4) Finished up with Clicking Ok and then Rip. Then I carried on some other tasks on the computer. When the CD finishes it opens the tray, I had to change it, insert the next and away it went – automatically.

Side note – I also had iTunes opening each time that I inserted a disc. To fix this I did the following.

  • Click on Start (or what should be start, the round ball in the bottom left corner).
  • Searched for “AutoPlay” (Can be found the long way under Control Panel -> All items).
  • Under “Audio CD” I changed the setting from “Play audio CD in iTunes” to ” Play audio CD using Windows Media Player” – Easy fix.