Tag Archives: WordPress

Issue with WordPress Autoptimize Cache filling up cPanel Server Space.

Issue with Autoptimize Cache filling up cPanel Server Space.
As a temporary fix, just run a cron to delete all the cache files once an hour.
– I have only seen this issue with a Multisite install, but I haven’t had a problem on single site installs.

Log into cPanel go to CRONs

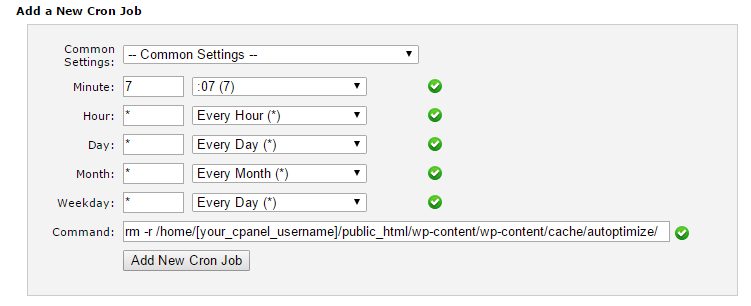
Under ‘Add a New Cron Job’ use the following settings:

Minute: 7
Hour: *
Day: *
Month: *
Weekday: *

Under the command section you need to first work out where your WordPress site is installed,
usually under cPanel it is under /home/[your_cpanel_username]/public_html/

Then you need to add the folder of the Autoptimize Cache folder, so the entire thing looks something like this:

/home/[your_cpanel_username]/public_html/wp-content/wp-content/cache/autoptimize/

Add the command rm -r at the start, put it all together and you have the right command:
!IMPORTANT! – The command rm -r will delete everything in the folder, if you get the path to the folder wrong, you could delete your entire website. You have been warned!

rm -r /home/[your_cpanel_username]/public_html/wp-content/wp-content/cache/autoptimize/


2016-01-14 10_20_04-cPanelX-CronJobs

So what we are doing is just at 7 minutes past the hour, of all hours, of all days, of all months, each weekday (that’s how you read the * in the cron) we delete all the files in the folder that we told it too.

WordPress MU Organise uploads

In a WPMU install there is no check box for “Organize my uploads into month- and year-based folders”

Instead you need to do the following:

network dashboard > my sites > sites

then edit each site, select site settings

then scroll down to “Uploads Use Yearmonth Folders”.
1= yes year/month,
0 = no year month, instead upload to /siteid/files/

Thanks to http://premium.wpmudev.org/forums/topic/how-do-i-turn-on-the-check-box-for-yearmonth-folder

htaccess max upload size in wordpress

I had a host today that wouldn’t allow wordpress to upload any files (images/themes/plugins).

It turns out some .htaccess magic saved the day:

SecFilterScanPOST Off
php_value upload_max_filesize 32M
php_value post_max_size 32M
php_value max_execution_time 300
php_value max_input_time 300

Given that it’s in the .htaccess file, it will only work on some hosts that allow you to configure php via the .htaccess, but hey if it works great!

Thanks to this site for help

cforms v14.6 – switching to custom CSS 403 error

Quick Notes:
TL;DR – When activating a custom CSS from the folder:
/plugins/cforms-custom/[your-css-file].css
You get a 403 error while running WordPress 4.

The issue seems to be in: cforms-css.php
~Line: 142:
Change: echo ‘<option style=”background:#fbd0d3″ selected=”selected” value=”../../cforms-custom/’.$f.'”>’.$f.'</option>’.”\n”;
To: (removing one of the ../)
echo ‘<option style=”background:#fbd0d3″ selected=”selected” value=”../cforms-custom/’.$f.'”>’.$f.'</option>’.”\n”;

Then again on ~Line: 144:
echo ‘<option value=”../../cforms-custom/’.$f.'”>’.$f.'</option>’;
To: (removing one of the ../)
echo ‘<option value=”../cforms-custom/’.$f.'”>’.$f.'</option>’;

This then causes an issue on the frontend. To fix this:

edit: cforms.php

Replace the following (~Line 1209):

if( $cformsSettings[‘global’][‘cforms_no_css’]<>’1′ )
echo ‘<link rel=”stylesheet” type=”text/css” href=”‘ . $cforms_root . ‘/styling/’ . $cformsSettings[‘global’][‘cforms_css’] . ‘” />’.”\n”;

With:

if( $cformsSettings[‘global’][‘cforms_no_css’]<>’1′ ){
if (strpos($cformsSettings[‘global’][‘cforms_css’],’cforms-custom’) !== false) {
$cformsCSSpath = “/”;
}else{
$cformsCSSpath = ‘/styling/’;
}
echo ‘<link rel=”stylesheet” type=”text/css” href=”‘ . $cforms_root . $cformsCSSpath . $cformsSettings[‘global’][‘cforms_css’] . ‘” />’.”\n”;
}


I hope that helps someone.


This doesn’t appear to work on both the front and the back end…

WordPress Three dot o dot one update

WordPress 3.0.1 is now available. So it’s time to update. Just remember to backup first, you might want to check out our blog post about backing up your Cpanel WordPress installation.

Here is an extract from the WordPress Blog about the latest release:

After nearly 11 million downloads of WordPress 3.0 in just 42 days, we’re releasing WordPress 3.0.1. The requisite haiku:

Three dot oh dot one
Bug fixes to make you smile
Update your WordPress

This maintenance release addresses about 50 minor issues. The testing many of you contributed prior to the release of 3.0 helped make it one of the best and most stable releases we’ve had.

More information at the WordPress blog.

Taking the Plunge – WordPress 3.0 Upgrade with Cpanel Backup.

There is always a risk involved in any upgrades, any of the following possibilities could happen:

1)      WordPress doesn’t successfully complete the upgrade of the new files (maybe because of file permission issues) and corrupts your current Word Press install.

2)      WordPress doesn’t successfully complete the upgrade any database changes and corrupts your Word Press install.

3)      Upgrade to the new version of WordPress was successful, but due to plug-in conflicts your WordPress install is broken.

But there is also a risk involved when you walk outside of your house. So how do we manage the risk? The answer is simple, do a backup.

Before installing any update, WordPress recommends that you go read and apply tips from the Article “WordPress Backups”[http://codex.wordpress.org/WordPress_Backups] from the Codex, which gives a great list of resources of how to backup using multiple tools. But one of the methods that they left out was using the Cpanel backup that is built into most shared hosting services these days. This tutorial is going to cover how to do it.

The main reason for using the Cpanel Backup wizard is that it quickly allows you to restore the backup without needing to know anything technical. Just a simple follow the steps in the Backup Restore wizard.

Backing up your WordPress install with Cpanel:

Time to complete: About 20 minutes (depending on how quick your internet connection is/size of your blog).

Skill Level: Easy.

1). Login to your webhosts Cpanel and find the “Backup Wizard” Icon.

Step 1 - Cpanel Backup

2). Select Backup under Backup and Restore.

Step 2 - Cpanel Backup Wizard

3). As tempting as it may be to click on full backup for our purposes today we need to click on “Home Directory” under the Partial Backup (this allows the backup to be restored under Cpanel if required).

Step 3 - Cpanel Partial Backup - Not a full backup!

4) Click on the Home Directory button to download the backup. – The size of this will depend on how big your blog is/how much storage that you are using with your hosting account.

Step 4 - Cpanel Home Directory Backup

5) Once the download is complete, click on Go Back, so you are presented with the screen from step 3, then click on MySQL Databases.

6) Download the Database that corresponds to your WordPress install. This screen shot shows that I have 2 databases. One is for a Joomla install and one is for WordPress, since they were automatically installed in the Cpanel they have generic names such as “sample_wrdp1” which makes it easy to do this.

Step 5 - Cpanel Database

7) Once you have everything downloaded, log into your WordPress Admin. Along the top there should be an alert that WordPress 3.x.x is available! Please update now. Click to update.

Step 7 - WordPress Admin with an Update Alert

8) WordPress then asks if you want to update automatically (easy option) or download the update to upload later (harder, but works on more hosts). I chose to update automatically.

9) WordPress will then perform the update and let you know when it’s finished.

Step 9 - The Upgrade Process

10) The first thing I noticed after the update was a new fresh Admin Theme.

Step 10 WPAdmin Fresh Upgrade Screen with new Admin Theme

11) Now check out your blog to make sure things are still working, also check to see if your plugins are working or if any need updates.

Photo: Thanks to zephyrance via Flickr