For some reason installing the UFR II/UFRII based printer on Mac OS is strangely complex.
Here’s what to do:
1) Download the correct driver for the Canon Machine / Mac OS from the canon site (I install C2020’s a lot: https://www.canon.com.au/multifunction-devices/imagerunner-advance-c2020/support)
2) Install the Package
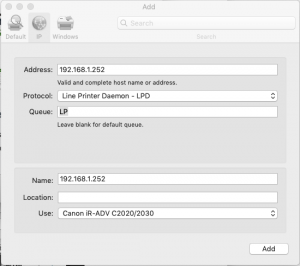
3) Within System Preferences > Printers > Add a New Printer.
4) Select ‘IP’ from the top tab. Fill the form in as follows:
Address: IP Address of the Printer
Protocol: Change to Line Printer Daemon
Queue: Insert ‘LP’ < this is the part I always forget.
Name: A logical name for the user
Location: A logical location for the user.
Use: Select the Driver from the one that you just installed, in my case I selected 'Canon iR-ADV C2020/2030
Click Add.

It now should now be setup to print.
If you want to setup the default settings on the printer, you need to use the CUPS web interface.
Visit: http://localhost:631/printers/ on the machine.
You’ll probably get a message about CUPS Web interface not being enabled, follow the prompts to open up ‘terminal’ and paste in
cupsctl WebInterface=yes
Then you’ll be able to access the printer UI.
From here you can select the printer, and change the default printer settings.
I always change from 2 sided printing to 1 sided, and from Color to B/W
There you go, installing a Canon Printer or Canon Photocopier on Mac OS X.